Wedding Cake Assembly

Stacked Wedding Cake

1. The Single Plate Separator plates have center nibs which are used to center cake boards. This allows easy removal and replacement of cakes onto the plates. Mark each cake board by marking a hole in the center with the sharp nib. Do this for cake boards on each tier.
2. Stacked cakes use same size board as cake. Tiered cakes use board 1 inch larger.
3. Mark each layer by lightly pressing a plate without columns onto the iced cake surface. Lift plate up off cake.
4. Assemble bottom of column by interlocking two smooth column pieces.
Note:: Collars are not needed for a stacked wedding cake.
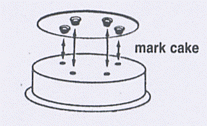
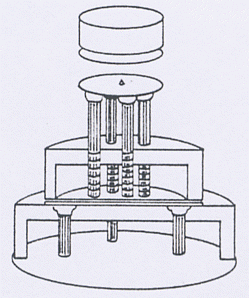
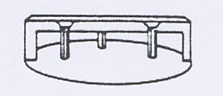
5. With interlocked smooth pieces, create holes in cake by piercing cake with smooth end of column, using a twisting motion. Make sure column reaches cake board.

NOTE: If interlocked pieces are the same height as the cake, no cutting is necessary. If interlocked pieces extend more than 1/2 inch above cake, cut 1/2 inch off flat end of bottom piece (at line marked 
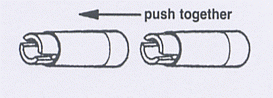
on column). If interlocked piece is more than 1/2 inch shorter than cake height, use ribbed piece of column for stacking cake. Pierce cake with ribbed piece, using a twisting motion. If ribbed piece extends more than 1 inch above cake, cut 1/2 inch off narrow end of  column (at line marked on column).

6. If using interlocked pieces, insert cut end of column into cake plate with a firm twist. If using ribbed piece, insert cut end of column into cake plate with a firm twist.

7. Make sure columns are secured firmly in cake plate. Columns can be adjusted slightly side to side for proper alignment.

also see Tiered Wedding Cake Assembly or Wedding Cake Instructions


Send mail to PastryWiz with questions or comments about this web site.
Privacy - Copyright © - PastryWiz
TM