Wedding Cake Instructions for Devotion
 Wedding Cake Decorating Wedding Cake Decorating
Everything you need to get to the top fast.Everything you need to create beautiful wedding cakes. Each style has been designed for fast and easy decorating while
offering tasteful elegance.
Before you start:
Using your favorite recipes bake, fill and assemble a 16 inch, 12 inch, 9 inch and
6 inch cake.
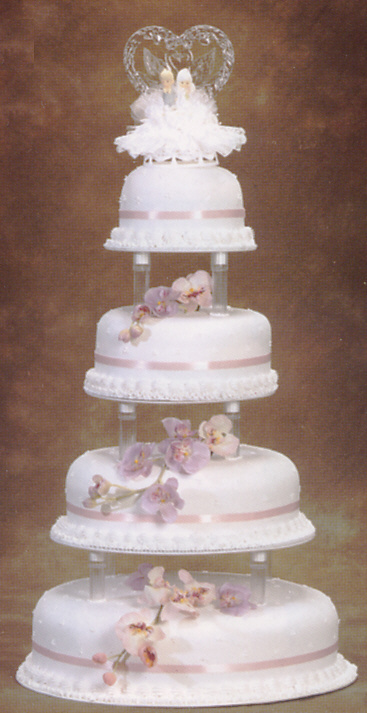
16 inch Cake
- Take four of the included Clear Columns and attach them to a 14 inch tier
plate. Please refer to the cake stand
assembling instructions.
- Round off the top edge of cake by trimming with a serrated knife.
- Crumb coat the cake and put in the freezer for about five minutes. This hardens the icing and
provides a firm surface for the final coat of icing, which should be applied as smoothly as possible
using a spatula and hot water.
- Complete the contour look by lightly brushing the surface with a Pastry
Brush dipped in hot water to smooth surface.
- Wrap ribbon around cake about 1 /3 of the way up from the bottom.
- Using pastry tip 67, pipe a ruffled border on bottom edge of board.
- For bottom border, pipe a shell border with a 22 pastry tip on top of ruffled border.
- Pipe 3 dots close together, forming a small triangle, with a 2 pastry tip
all over top and sides of cake, above ribbon, as shown in picture.
- Take the tier plate and columns that you used in step 1 and push through to the bottom of the cake,
using the holes that you have previously made.
- Pipe a ring of dots around bottoms of columns using pastry tip 2.
12 inch Cake
- Take four of the included Clear Columns and attach them to a 10 inch tier plate. Please refer to
the cake stand assembling instructions.
- Round off the top edge of cake by trimming with a serrated knife.
- Crumb coat the cake and put in the freezer for about five minutes. This hardens the icing and
provides a firm surface for the final coat of icing, which should be applied as smoothly as possible
using a spatula and hot water.
- Complete the contour look by lightly brushing the surface with a Pastry
Brush dipped in hot water to smooth surface.
- Wrap ribbon around cake about 1/3 of the way up from the bottom.
- Using a 67 pastry tip, pipe a ruffled border on bottom edge of board.
- For bottom border, pipe a shell border using pastry tip 22 on top of ruffled border.
- Pipe 3 dots close together, forming a small triangle, with a 2 pastry tip
all over top and sides of cake, above ribbon, as shown in picture.
- Take the tier plate and columns that you used in step 1 and push through to the bottom of the cake,
using the holes that you have previously made.
- Pipe a ring of dots around bottoms of columns using pastry tip 2.
9 inch Cake
- Take four of the included Clear Columns and attach them to a 8 inch tier plate. Please refer to
the cake stand assembling instructions.
- Round off the top edge of cake by trimming with a serrated knife.
- Crumb coat the cake and put in the freezer for about five minutes. This hardens the icing and
provides a firm surface for the final coat of icing, which should be applied as smoothly as possible
using a spatula and hot water.
- Complete the contour look by lightly brushing the surface with a Pastry
Brush dipped in hot water to smooth surface.
- Wrap ribbon around cake about 1 /3 of the way up from the bottom.
- Using pastry tip 67, pipe a ruffled border on bottom edge of board.
- For bottom border, pipe a shell border using pastry tip 22 on top of ruffled border.
- Pipe 3 dots close together, forming a small triangle, with a 2 pastry tip
all over top and sides of cake, above ribbon, as shown in picture.
- Take the tier plate and columns that you used in step 1 and push through to the bottom of the cake,
using the holes that you have previously made.
- Pipe a ring of dots around bottoms of columns using pastry tip 2.
6 inch Cake
- Round off the top edge of cake by trimming with a serrated knife.
- Crumb coat the cake and put in the freezer for about five minutes. This hardens the
icing and provides a firm surface for the final coat of icing, which should be applied as smoothly as
possible using a spatula and hot water.
- Complete the contour look by lightly brushing the surface with a Pastry
Brush dipped in hot water to smooth surface.
- Wrap ribbon around cake about 1/3 of the way up from the bottom.
- Using pastry tip 67, pipe a ruffled border on bottom edge of board.
- For bottom border, pipe a shell border using pastry tip 22 on top of ruffled border.
- Pipe 3 dots close together, forming a small triangle, with a 2 pastry tip
all over top and sides of cake, above ribbon.
Optional Instructions
- Arrange fresh
flowers or Gum Paste Flowers on front edge of 16
inch,
12 inch and 9 inch cake as shown in picture to give a different look.
back Devotion Wedding Cake next Wedding Cake Decorating Instructions - Delicate Cherub | |
|
