Temper the milk chocolate. The working temperature for making the milk chocolate bases should be
89°F to 91°F, slightly higher than the normal dipping temperature for milk
chocolate. (The process of spreading the chocolate into a thin layer will
continue to temper the chocolate.)
Place a 12-by-16-inch rectangle baking parchment or waxed paper on a flat
Formica or wood work surface, with the long sides lying parallel in front of
you. (Do not lay paper on a marble, granite, or a metal countertop, as the
chocolate will set up too quickly on any of these work surfaces.)
Pour half (3 ounces) of the tempered milk chocolate in a thin line about 8
inches long down the center of the paper. Using an 8-inch offset metal cake
spatula, quickly spread the chocolate into a paper-thin rectangle, about 1/32
inch thick, leaving about a 1/4 inch border around the edge of the paper.
Continue moving the spatula back and forth over the chocolate rectangle for 10
to 20 seconds, or until the chocolate starts to feel tacky and begins to loose
its sheen.
As the milk chocolate starts to set, press the 1-inch round open end of a
closed start decorating tip (such as Ateco#2) into the chocolate rectangle,
leaving about 1/2-inch of space between each circle. Continue using the tip as a
cutter, until you have pressed thirty-five 1-inch rounds. Leave the round
chocolate bases attached to the paper. Cover the bases with a sheet of baking parchment
or waxed paper and weight with a heavy baking sheet. (The weight will prevent
the chocolate bases from curling up as the chocolate contracts while it
hardens.) Leave the round chocolate bases under the baking sheet until ready to
pipe the chocolate mice centers.
Using the remaining 3 ounces of tempered milk chocolate, repeat steps 2
through 4 of making the round chocolate bases. Place the second sheet of paper
with round chocolate bases on top to the first sheet of chocolate bases and
cover with a piece of parchment or waxed paper. Replace the baking sheet
on top of the chocolate bases.
Whip the hazelnut praline mousse ganache
Cut the pointed end off a disposable pastry bag and insert a 5/8-inch plain
decorating tip. Twist the portion of the pastry bag
that is just above the wider opening of the tip. Tuck this twisted portion of
the bag into the wider opening of the tip. (This will prevent the whipped
ganache from leaking out the end of the decoration tip before you are ready to
pipe.) Place the bag into a 2-cup glass measuring cup. Turn down the top 2 to 3
inches of the pastry bag, forming a cuff around the outside of the measuring
cup. (The cup will support the bag as you fill it with the whipped ganache.)
Remove the plastic wrap from the chilled ganache. Gently warm the bottom of
the baking sheet by passing it back and forth a few times over a gas flame or
electric range top set on medium. Heat the pan only until the ganache starts to
melt slightly so that it can be easily removed from the pan. Using a rubber
spatula, scrape half (about 1 cup) of the ganache into the bowl of a
heavy-duty electric mixer.
Set the bowl over another bowl of hot, not simmering water (the water must
touch the bottom of the bowl) for 30 seconds to 2 minutes, stirring constantly
with a rubber spatula until the ganache reads 65°F on a digital thermometer and
has softened to the consistency of handmade mayonnaise. Be careful not to
overheat the ganache. If the ganache becomes warmer than 65°F, place the bowl
over a bowl of ice water for 2 to 4 seconds. Stir the ganache with a rubber
spatula, just until it starts to thicken. Remove the bowl from the ice water.
Using the wire whip attachment,, whip the softened ganache at medium speed
for 30 seconds to 2 minutes, or until it lightens in color and forms soft peaks.
It should have the texture of a fluffy chocolate buttercream frosting with a
good piping consistency. If the whipped ganache becomes too firm and appears
grainy, replace the bowl over the hot water for 2 to 4 seconds and stir gently
until it softens enough to be rewhipped. Conversely, if the ganache is too soft
and will not form soft peaks, place it over the bowl of ice water and stir for 2
to 4 seconds, until it just starts to thicken. Continue whipping until the
ganache reaches the proper consistency.
Pipe the whipped ganache
Immediately scrape the ganache into the prepared pastry bag. Work quickly as
the ganache will start to set up shortly after it is whipped. Remove the baking
sheet and paper covering a sheet of chocolate bases. Hold the tip of the piping
bag in at a 20-degree angle, barely touching the middle of a round chocolate
base. Pipe the ganache into a 1 1/4 -inch teardrop-shaped mound with an
accentuated point - the head section of the mouse. Quickly finish piping
the ganache onto the remaining chocolate bases.
Using the remaining chilled ganache, repeat steps 3 and 4 of whipping the
hazelnut praline mousse ganache, and step 1 of piping the whipped ganache onto
the sheet of the remaining chocolate bases.
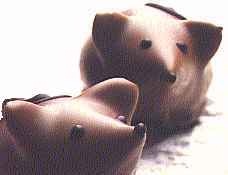
To form mouse ears, break a sliced almond in half and insert the broken ends
of each half into the head portion of a piped mouse. Insert two almond ears into
each of the remaining mice. Cover the mice with plastic wrap and refrigerate for
10 to 20 minutes, until firm.
Individually transfer the chilled mice centers (still attached to their
chocolate bases) to a paper-lined baking sheet. The leftover chocolate trimmings
can be saved for another use. Cover the mice centers loosely with a sheet of
waxed paper or baking parchment and let them stand at room temperature for 1
hour before coating.