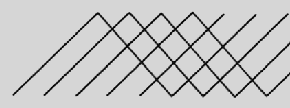
The illustrations below show simple patterns made with the falling
method that the beginner should practice and master before proceeding to more
complicated designs. Any of these designs can be practiced by first drawing it in dark ink
on a sheet of paper, then placing a sheet of translucent parchment or a plate of glass
over the design. Pipe the icing onto the parchment, using the design as a guide.
Make sure you apply constant pressure on the cone so that all the lines are equally
thick. Try to pipe straight lines (not easy I know!) and keep the space between the lines
constant.
All lines need to be equally thick Keep the spacing between the lines constant in
every direction so that the squares have sides of equal length.
Here again, keep the spacing between the lines constant so that all lines are of the
same length, resulting in an unfinished square.
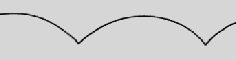
All lines need to be equally thick and all waves of equal length, depth and height.
This is the same as above, but with a second wave line piped on top in the same, but
upside down matter.